How to Edit a PDF Without Adobe Acrobat — A Complete Guide
June 2026
10 min read
Adobe Acrobat costs around $20 a month. For most people — students, freelancers, small business owners, or anyone who just needs to edit a PDF once in a while — that's a hard number to justify. Especially when the task at hand is something simple: adding a signature, highlighting a clause, filling in a form field, or redacting a line of text before sharing.
The QuickPDFOnline PDF Editor covers every one of those tasks — and more — for free, in your browser, without installing a single thing. This guide walks through all 18 editing features: what each one does, when you'd actually use it, and exactly how to do it.
Add Text
Highlight Text
Draw Freehand
Add Shapes
Add Arrows
Add Lines
Insert Symbols
Add Signature
Add Notes
Add Stamps
Insert Images
Redact Content
Undo / Redo
Smart Alignment Guides
Erase Tool
Copy / Paste / Duplicate
Zoom In / Out / Fit
Resize & Rotate Shapes
How to Open a PDF in the Editor
Before getting into individual features, here's the starting point. The whole process takes about 10 seconds.
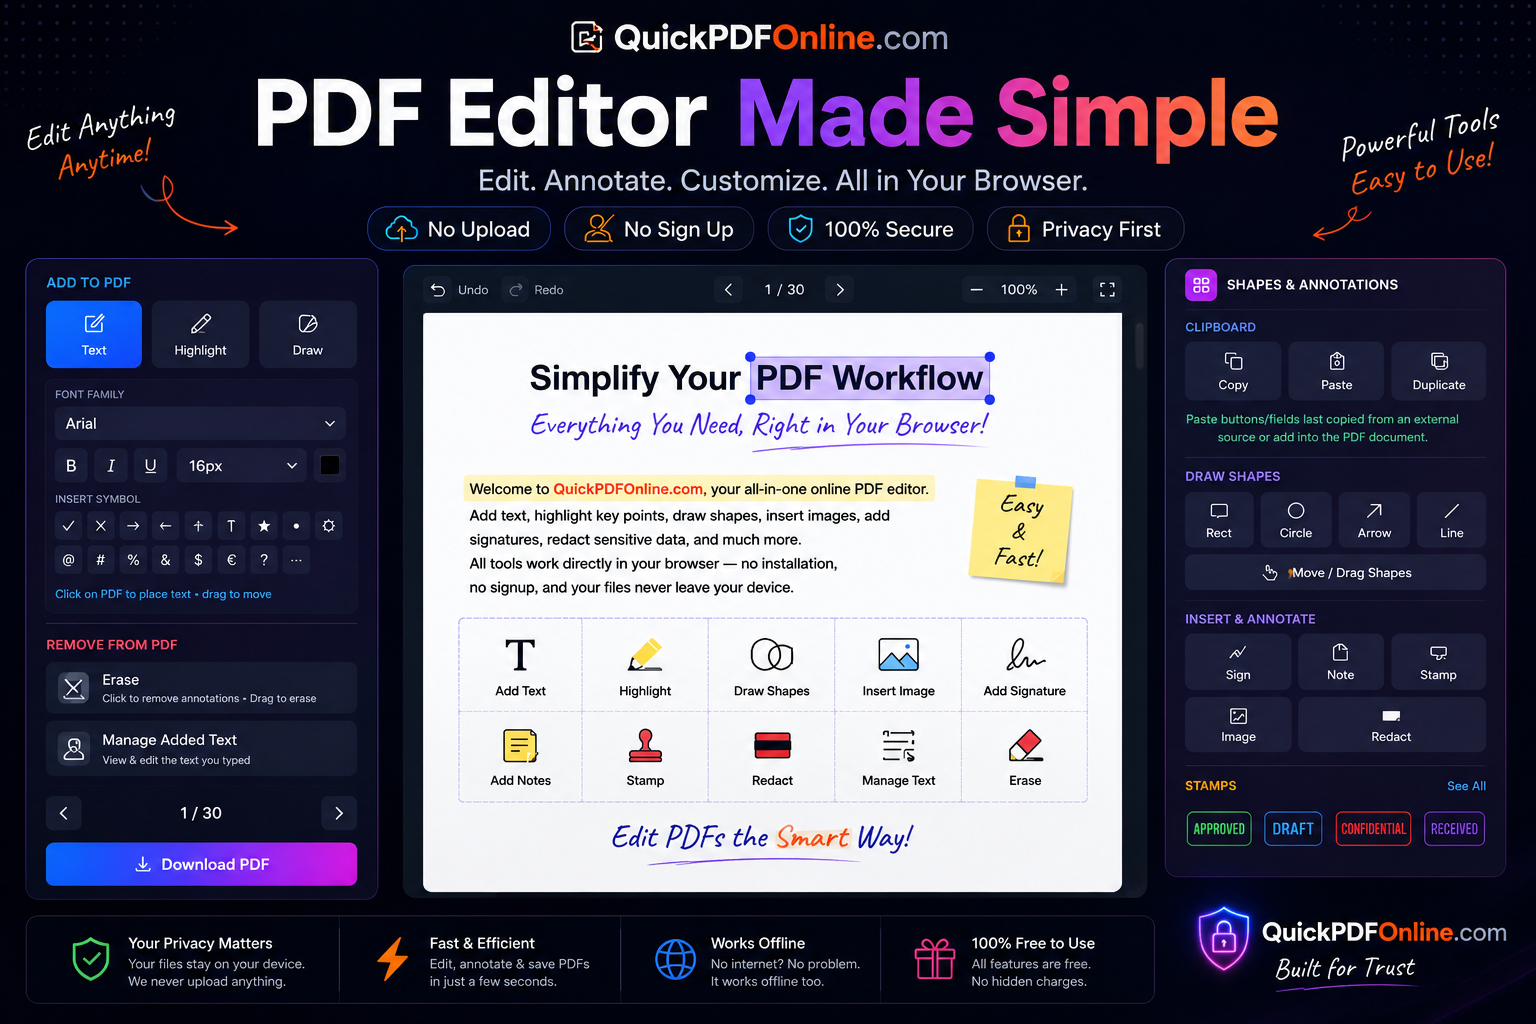
QuickPDFOnline PDF Editor interface with text editing, annotations, signatures, images, and redaction tools.
💡 Quick Overview
The screenshot above shows the complete
QuickPDFOnline PDF Editor.
Every feature works directly in your browser...
🎥 Watch PDF Editor Video Tutorial
See every PDF editing feature in action, including Add Text, Highlight, Draw, Sign, Redact, Insert Images, and more.
Click "Choose File" or drag and drop your PDF directly onto the page. Your file loads in the browser — it doesn't go anywhere else.
3
Use the toolbar on the left
Once the PDF loads, the editing toolbar appears on the left side. All 18 features are accessible from here. The right panel shows contextual options depending on what you've selected.
4
Download when done
Click "Download PDF" at the bottom of the left panel. Your edited file saves to your device — clean, no watermark.
Important: Everything processes in your browser. Your PDF is never uploaded to any server. This makes the editor safe to use with confidential documents — contracts, legal files, medical records, financial statements.
1. Add Text
01
Add Text
Add Content
This is probably the most-used feature in any PDF editor. You click anywhere on the page and type. But it's not just a plain text box — the editor gives you full font controls: family — including standard fonts like Arial and Times New Roman, Google Fonts like Montserrat and Playfair Display, handwriting-style fonts like Dancing Script and Pacifico, and Hindi/Devanagari fonts like Noto Sans Devanagari and Hind — plus size, bold, italic, underline, and color. You can drag the text anywhere after placing it, and resize it if needed.
This is how most people fill out forms that aren't interactive, add notes to a document before sharing, or insert information that was missing from the original file.
How to use it
Click the Text button in the left toolbar under "Add to PDF."
Set your font family, size, and style in the panel that appears below the button.
Click anywhere on the PDF page to place the text cursor.
Type your content. Drag the text box to reposition it.
Click outside the text box to deselect.
Filling out a non-interactive formAdding your name/date to a documentInserting missing information into a scanned file
2. Highlight Text
02
Highlight Text
Annotate
The highlight tool works exactly like a physical highlighter — drag across text to mark it. You can change the highlight color, which makes it useful for color-coded reviews: yellow for important, red for concerns, green for approved. The highlight sits on top of the original text without modifying it.
Lawyers reviewing contracts, students studying, and anyone doing a document review will use this constantly.
How to use it
Click the Highlight button in the left toolbar.
Choose your highlight color from the color picker.
Click and drag over the text you want to highlight.
Release to apply. The highlight saves with the document.
Marking key clauses in a contractColor-coded document reviewStudy notes on academic PDFs
3. Draw Freehand
03
Draw Freehand
Annotate
Freehand drawing lets you write or sketch directly on any PDF page — like drawing with a pen on paper. You control the stroke color and thickness. It's not the precision of a shape tool, but that's exactly the point: sometimes you need to circle something quickly, cross something out, sketch a diagram, or leave a handwritten-looking note on a document.
It's particularly useful on tablets or touch devices where you can draw naturally with a stylus.
How to use it
Click the Draw button in the left toolbar.
Select your pen color and stroke width from the options panel.
Click and drag on the PDF to draw freehand.
Release to finish each stroke. Multiple strokes can be added.
Use Undo (Ctrl+Z) to remove the last stroke if needed.
Circling an error or item to fixCrossing out incorrect informationQuick sketch or diagram on a blank page
4. Add Shapes
04
Add Shapes
Add Content
The shape tool gives you rectangles, circles (ovals), and other basic geometry that you can place and resize anywhere on the page. Shapes can be used as visual callouts, section dividers, emphasis boxes, or to block content (though for true privacy removal, use the Redact tool instead). You control the fill color, border color, and opacity.
One practical use: drawing a rectangle around a section of a document to visually frame it for a presentation or a handout.
How to use it
In the right panel under Draw Shapes, click Rect or Circle.
Click and drag on the PDF to draw the shape.
Use the Move / Drag Shapes option to reposition after placing.
Adjust fill, border color, and opacity from the right panel controls.
Framing a section for emphasisAdding a visual callout boxCreating diagram overlays on a PDF
5. Add Arrows
05
Add Arrows
Annotate
Arrows let you point to something specific on the page — a figure in a table, a word in a paragraph, a detail in a diagram. This is the kind of annotation that's obvious when you need it: you want to draw someone's attention to a specific spot, and a text note alone doesn't quite do it. An arrow does.
You can control the arrow's color and weight. Draw it from any point to any other point on the page.
How to use it
In the right panel under Draw Shapes, click Arrow.
Click on the starting point of your arrow on the PDF.
Drag to where the arrowhead should point, then release.
Adjust color and stroke width as needed.
Pointing to a specific figure or valueAnnotating a diagram or chartReview markup — "this section needs revision"
6. Add Lines
06
Add Lines
Add Content
Lines are straight strokes without an arrowhead. They're used for things like underlining text that can't be underlined through the text tool (because it's in a scanned document), adding a horizontal divider between sections, or striking through content you want to mark as removed without actually deleting it.
Simple and underused — but when you need a clean straight line, freehand drawing just doesn't cut it.
How to use it
In the right panel under Draw Shapes, click Line.
Click your starting point on the PDF and drag to your endpoint.
Release to place the line.
Adjust color and line weight from the panel controls.
Underlining text in a scanned documentStrikethrough on content to be removedAdding dividers between sections
The signature tool in the right panel under "Insert & Annotate" lets you sign a document without printing, signing by hand, and scanning it back. You can draw your signature using your mouse or touchscreen, and place it anywhere on the page. Once placed, you can resize and reposition it like any other element.
For everyday document signing — NDAs, agreements, authorization letters, HR forms — this gets the job done in under a minute. No e-signature service subscription required.
How to use it
In the right panel under Insert & Annotate, click Sign.
A drawing canvas appears — draw your signature using your mouse or finger.
Click "Apply" or "Insert" to place the signature on the document.
Drag it to the signature line and resize as needed.
Download the signed PDF — it's ready to send.
Signing contracts and agreementsAuthorization letters and HR formsAny document requiring a physical signature
9. Add Notes
09
Add Notes
Annotate
Notes (also called sticky notes or comment annotations) attach to a specific point on the page. Unlike text you add with the Text tool, notes are collapsible — they show as a small icon on the page and expand when clicked. This keeps the document clean while still allowing comments to be embedded.
This is how reviewers and editors leave feedback on a PDF without cluttering the visual layout of the document itself.
How to use it
In the right panel under Insert & Annotate, click Note.
Click anywhere on the PDF to place the note anchor.
Type your comment in the note input that appears.
The note icon appears on the page — click it to expand or collapse.
Leaving review comments for a colleagueFlagging sections for follow-upInternal notes on client documents before sharing
10. Add Stamps
10
Add Stamps
Annotate
Stamps are pre-designed labels you can place on a document to communicate its status at a glance: "Approved," "Rejected," "Confidential," "Draft," "Reviewed." They look exactly like rubber stamps — styled text with a border. Place one on the first page of a document and anyone who opens it immediately knows where it stands.
For businesses that review and approve documents regularly, stamps replace the need to print and physically stamp paper, then scan it back.
How to use it
In the right panel, scroll to the Stamps section.
Choose the stamp type: Approved, Rejected, Confidential, Draft, etc.
Click on the PDF page where you want to place the stamp.
Drag to reposition. Resize if needed.
Marking documents as Approved or RejectedLabelling drafts before final versionConfidential stamp on sensitive documents
11. Insert Images
11
Insert Images
Add Content
You can insert a JPG or PNG image directly onto any page of the PDF. Once placed, it behaves like any other element — drag to position, resize by pulling the corners. Common uses include adding a company logo, inserting a photo, placing a scanned signature image (as an alternative to drawing one), or embedding a chart or diagram from another source.
This is also useful for adding a profile photo to a CV in PDF format, or replacing a placeholder image in a template.
How to use it
In the right panel under Insert & Annotate, click Image.
Select an image file from your device (JPG or PNG).
The image appears on the current page — drag it to position.
Resize using the corner handles.
Click outside to deselect, or continue editing other elements.
Adding a company logo to a documentInserting a scanned signature imageEmbedding a chart or diagram from another file
12. Redact Content
12
Redact Content
Security
Redaction permanently removes content from a PDF. Not covers it — removes it. This is a critical distinction. If you draw a black rectangle over sensitive text using the shape tool, that text is still in the file and can be revealed by deleting the shape or copying the underlying text. True redaction, like what this tool provides, strips the data from the document entirely.
Use this any time you need to share a document that contains information the recipient isn't supposed to see — personal details, financial figures, confidential clauses, names in a legal filing.
How to use it
In the right panel under Insert & Annotate, click Redact.
Click and drag over the content you want to permanently remove.
A black redaction box appears over the selected area.
Apply redaction — the underlying content is permanently removed.
Download the redacted PDF. The removed content cannot be recovered.
Removing personal data before sharingRedacting confidential clauses in a contractPreparing legal documents for public filing
Always double-check after redacting: After downloading your redacted PDF, open it and try selecting text in the redacted areas. If nothing is selectable, the redaction worked. If you can still highlight or copy text there, the content wasn't truly removed — in that case, use the Redact tool again and re-apply.
13. Undo / Redo
13
Undo / Redo
Edit Control
Every action you take in the editor — placing text, drawing a shape, adding a signature, highlighting — can be undone. The Undo and Redo buttons sit at the top of the editor toolbar, and the standard keyboard shortcuts work too. This is what makes the editor genuinely usable: you don't have to be careful about every click because nothing is permanent until you download.
Made a mistake? Ctrl+Z. Undid too much? Ctrl+Y brings it back.
How to use it
Click the Undo button at the top of the editor to reverse the last action.
Click Redo to reapply an action you just undid.
Keyboard shortcut: Ctrl+Z (Undo) and Ctrl+Y (Redo) on Windows.
On Mac: Cmd+Z (Undo) and Cmd+Shift+Z (Redo).
Reversing an accidental editComparing before/after a changeRecovering from a misplaced annotation
14. Smart Alignment Guides (Snap-to-Align)
14
Smart Alignment Guides (Snap-to-Align)
Precision
Borrowed from tools like Word, PowerPoint, and Canva — as you drag a placed text box around the page, it automatically snaps to the left edge, center, or right edge of nearby text, and locks onto the same baseline so multiple lines stay perfectly aligned instead of drifting a few pixels off. It also snaps to the page's horizontal center, which makes centering a heading or title effortless. A pink dashed guide line appears the moment something snaps, giving you clear visual confirmation.
Need to place something freely without any snapping? Just hold Alt while dragging to temporarily turn it off.
How to use it
Place at least two pieces of text on the page using the Text tool.
Click and drag any placed text — as it nears another text's edge, center, or baseline, it snaps into place automatically.
Watch for the pink dashed guide line — that's your cue that an alignment point has been hit.
Hold Alt while dragging if you want to position the text freely, ignoring the snap points.
Lining up form field labels perfectlyCentering a heading on the pageKeeping multi-line annotations on the same baseline
15. Erase Tool
15
Erase Tool
Cleanup
The Erase tool is different from Redact — it's for undoing something you've already added rather than removing original content from the file. Click directly on a highlight, a freehand stroke, or a piece of text you typed, and that single item is removed instantly. You can also click and drag to paint a white box over any part of the page, useful for quickly covering a small mistake before retyping over it.
It's the fastest way to fix one specific thing without undoing your entire editing session.
How to use it
Click the Erase button in the left toolbar under "Remove from PDF."
Click directly on a highlight, freehand stroke, or piece of added text to remove just that item.
Or click and drag to draw a white box over any area of the page.
Use Undo if you erase the wrong thing.
Removing a single misplaced highlightCleaning up a stray pen strokeCovering a small mistake before retyping over it
16. Copy, Paste & Duplicate
16
Copy, Paste & Duplicate
Edit Control
The "Clipboard" section in the right panel gives you Copy, Paste, and Duplicate buttons that work on both text boxes and shapes. Duplicate does both steps in one click, dropping a copy right next to the original so you can reposition it. Paste is also smart about your system clipboard — text you've copied from another document or webpage can be pasted directly onto the PDF page, not just content copied inside the editor.
Standard keyboard shortcuts work too: Ctrl+C to copy, Ctrl+V to paste, Ctrl+D to duplicate, and Ctrl+A to select all text on the current page.
How to use it
Select a text box or shape you've already placed on the page.
Click Copy in the Clipboard section (or press Ctrl+C).
Click Paste (Ctrl+V) to drop a copy nearby, or Duplicate (Ctrl+D) to do both in one click.
Text copied from outside the editor also pastes directly onto the page using the same Paste button.
Repeating the same label or stamp across a pageQuickly duplicating a signature blockPasting text copied from another document
17. Zoom In / Out / Fit to Page
17
Zoom In / Out / Fit to Page
Navigation
Zoom controls let you get closer to the page for precise placement, or pull back to see the full layout, without touching the actual size or position of your edits — zooming is purely a view-level change, from 40% up to 300%. Besides the +/- buttons, you can hold Ctrl (or Cmd on Mac) and scroll your mouse wheel over the page for quick zooming, and reset back to the default view with a single click on "Fit."
This makes a real difference when you're working on dense text, small print, or a high-resolution scanned document where every pixel counts.
How to use it
Use the + / - buttons near the page controls to zoom in or out.
Hold Ctrl (or Cmd on Mac) and scroll your mouse wheel over the page for quick zooming.
Click Fit to reset back to the default 100% view.
Zooming is purely visual — it never changes the position or size of your annotations in the exported PDF.
Zooming in for precise placement on dense or small textZooming out to see the full page layout at onceWorking comfortably on high-resolution scanned documents
18. Resize & Rotate Shapes and Images
18
Resize & Rotate Shapes and Images
Edit Control
Once a shape, image, or signature is placed on the page, it isn't fixed in place. Corner and edge handles let you resize it precisely — images and signatures keep their aspect ratio automatically so they never look stretched. A dedicated rotate handle lets you angle it freely, and the [ and ] keys nudge the rotation in clean 5° steps for fine control. A small size panel shows the live width, height, and rotation angle as you adjust, so you always know the exact numbers.
This is especially useful for matching a stamp or signature to a slightly skewed scanned page, or fitting a logo neatly into a tight space.
How to use it
Select a shape or image already placed on the page using the Select tool.
Drag any corner or edge handle to resize it.
Drag the green rotate handle above the shape to rotate it freely, or use the [ and ] keys to rotate in 5° steps.
Check the size panel for the exact width, height, and rotation angle as you adjust.
Fitting a logo neatly into a signature blockRotating a stamp to match a skewed scanned pageResizing a box precisely over a specific area
Frequently Asked Questions
Yes — all features described in this guide are free. No subscription, no trial period, no account required. You can use every feature including redaction, signatures, and stamps without paying anything.
No. The downloaded PDF is completely clean — no QuickPDFOnline branding, no watermarks. What you edited is exactly what you get back.
The editor adds content on top of the existing PDF — new text, annotations, shapes, and signatures. Directly modifying the original embedded text in the PDF is a technically different operation (called "text reflow") that requires parsing the PDF's content structure, which most browser-based editors don't support. For replacing existing text, the common workaround is to redact the old text and add new text on top in the same area.
Yes. The editor works in any modern mobile browser. Touch input works well for drawing, freehand, and placing elements. The toolbar is accessible on smaller screens. For precise text placement or detailed annotation, a desktop or tablet experience is more comfortable — but for signing, stamping, or adding text, mobile works fine.
Yes — because your file never leaves your device. All processing is client-side, meaning it runs entirely in your browser. No file data is sent to any server. You can verify this by opening your browser's developer tools (F12), going to the Network tab, and watching what happens when you load a PDF — you'll see no file upload requests.
Yes. The "Manage Added Text" option in the left panel under "Remove from PDF" shows you a list of all the text elements you've added in the current session. You can select and delete specific entries from there, which is useful when you've added many text items and need to clean up specific ones without undoing everything.
No, and this is expected behavior rather than a bug. Since nothing is ever uploaded to a server, everything you add lives only in that browser tab's memory until you click "Download PDF" — that's the point at which it's permanently baked into the file. Opening the original file again on another device or browser starts a fresh, empty editing session. If you want your edits to carry over, download the edited PDF first, then open that downloaded file wherever you need it next.
Conclusion
Between adding text, highlighting, drawing, inserting images, signing, stamping, redacting, and fine-tuning placement with alignment guides, zoom, and rotation — the QuickPDFOnline PDF Editor covers the full range of what most people need from a PDF editor in day-to-day work. The fact that it's free, requires no account, and never uploads your files makes it a genuinely better choice than most paid alternatives for the kind of editing tasks this guide covers. Adobe Acrobat is a powerful tool — but for 95% of what people actually do with PDFs, you don't need it.
Start Editing Your PDF Now
Add text, highlight, sign, redact, symbol, image, hide text from file and annotate PDFs directly in your browser. No upload, no account required